# Getting Started
In this lab, we will get started with connecting to the class network. This includes the basics of the software needed as well as basic terminology and mechanics of Ethereum networks.
# The Basics
The main thing you will deal with on Ethereum networks are Accounts and Contracts. Please refer to this document (opens new window) for detailed explanation.
# Accounts
An account at its simplest is simply a cryptographic public-private key pair. The public part of the key is how you are identified on the network. For example, if you wanted to tell your friend how to send you money on the network you could simply tell them your public key.
TIP
Since Ethereum uses the ECDSA (opens new window) scheme for public-private cryptography, its keys are fairly short (compared to say, RSA) and can be easily represented with a small hex string like:
0x95222290DD7278Aa3Ddd389Cc1E1d165CC4BAfe5
The private part of the key-pair is what you keep secret and proves your ownership of the account. In order to perform a transaction, you sign messages that could be written in English as:
I want to send
10ether/ETH to address0xf00
By broadcasting this signed messaged to the network, people can verify the signature and confirm that it was indeed you (or someone with your private key!) that approved the transaction.
# Contracts
Smart Contracts are what distinguish Ethereum from older cryptocurrency networks like Bitcoin. One can deploy full turing-complete programs on an Ethereum network.
These smart contracts can hold their own balance of money and send it to other contracts and accounts. Consider the following example of a piggy-bank program that forces you to save money until a given date in psuedo-code:
# My piggy-bank program!
balance = 0

def deposit(amount):
  balance += amount

def withdraw(amount):
  if current_date() < Date("5 May 2022"):
    raise Error("Can't withdraw before the 5th of May!")
  if amount > balance:
    raise Error("Can't withdraw more than current balance")
  send_amount(amount)
  balance -= amount
This makes it possible to deposit money into the contract at any time but it
is not possible to withdraw it until after the 5th of May, 2022.
One could write such a program and deploy it to the Ethereum blockchain, it
will run completely autonomously, we can call the withdraw method on it and
other computers on the Ethereum network will run the code and verify that the
user is actually allowed to withdraw the money before sending it.
# Connecting to the Network
The first thing we need to connect to the ClassNet is an Ethereum Node.
A node connects to other nodes on the network. It downloads the blocks of the blockchain from these other nodes and verifies them to make sure they are correct all the way from the start of the blockchain to the current block.
By performing this verification, it can also store the state of the blockchain
at any given time. This allows you to answer questions such as: what was the
balance of account 0xabc at block number 123?
An ethereum node first connects to a bootstrapping node, this acts as a known starting point from where the node can start to discover other nodes on the network.
# Setting up a node
We will be using Go Ethereum (geth) (opens new window) as the node software in this class. Geth is the official Go client for Ethereum and cross-platform so it should be usable on Mac/Linux and Windows machines.
WARNING
For Windows, we highly recommend using Windows Subsystem for Linux (opens new window) or
a virtual machine with Linux as these instructions are written with *nix systems
in mind.
# Installing geth
Get started by following the official geth instructions on Installing Geth (opens new window) for your operating system.
# Setting up geth
Once you've followed the instructions above, you should be able to verify geth
is installed by running the command:
$ geth version
Geth
Version: 1.10.26-stable
Git Commit: e5eb32acee19cc9fca6a03b10283b7484246b15a
Architecture: amd64
Go Version: go1.18.5
Operating System: linux
GOPATH=
GOROOT=go
Since we are going to be using geth on a private Ethereum network, we need to
perform some setup steps.
Clone or download the git repo blockchain-lab-pwneth (opens new window) or download a .zip (opens new window).
This contains some convenience scripts to set up and run geth. On Mac and Linux you should be able to execute the scripts directly.
$ git clone https://github.com/sslab-gatech/blockchain-lab-pwneth.git pwneth
...
$ cd pwneth
- We initialize the geth data directory with
./setup.sh:
$ cat ./setup.sh
...
geth init --datadir "./geth-data" ./genesis.json

$ ./setup.sh
...
INFO [01-05|18:03:15.581] Writing custom genesis block
INFO [01-05|18:03:15.582] Persisted trie from memory database
INFO [01-05|18:03:15.582] Successfully wrote genesis state  hash=f7bab1..e3c1cc
- Start
gethwith:
$ ./geth.sh
INFO [01-05|18:07:10.488] Maximum peer count            ETH=50 LES=0 total=50
...
INFO [01-05|18:07:22.498] Imported new chain segment    blocks=144
A quick rundown of the command line arguments:
--networkid=1337- Ethereum uses a network id number to prevent replaying transactions from different networks, this tellsgethwhat ClassNet's network id is.--syncmode=full --gcmode=archive- Normallygethattempts to do a fast mode of synchronizing with the blockchain, these arguments cause it to verify the full chain and keep around the historical data so you have the state of the network at any given point. This takes a large amount of storage to do on the main Ethereum network but for our class network it is worth the few extra megabytes for a better development experience.--http --http.corsdomain="*" --http.api=web3,eth,debug,net- Makes geth serve a JSON API over port 8545, this is a standard API specified by Ethereum (opens new window) that allows software to interact with the blockchain.--bootnodes=...- As mentioned above, the bootnode is how our node connects to other nodes, we specify a central bootnode hosted by the instructors.
# Exploring geth
Now that we have geth connected to the class network, let's explore a little bit on what it's doing.
geth comes with a built-in javascript console (opens new window)
that we can connect to the geth instance we ran earlier by running geth attach
in a different terminal:
$ ./geth-attach.sh
Welcome to the Geth JavaScript console!

instance: Geth/v1.10.26-stable-e5eb32ac/linux-amd64/go1.18.5
at block: 4313 (Thu Dec 15 2022 23:37:06 GMT-0500 (EST))
 datadir: /home/ammar/.ethereum

To exit, press ctrl-d or type exit
>
We can now interact with the running geth instance and explore what it's doing.
Upon starting up, geth will attempt to connect to the bootnode and then try to
connect to the peers it provides, we can view who we're connected to with
admin.peers:
> admin.peers
[{
    caps: ["eth/66", "eth/67", "snap/1"],
    enode: "enode://d6686e0acb89f5b42d325aaad6a77f6d2c4fe9d2966a45e153ed50051e7617ee22e027ec78e600a2720482399ab74375e97287d357e9f1e4bea473a44c4842ec@128.61.241.144:30303",
    id: "f2988dc0178eb1fac832e9b5060388e5b512b5cf1cfecba98b8eb3e1d225cce1",
    name: "Geth/v1.10.26-stable-e5eb32ac/linux-amd64/go1.18.8",
    network: {
      localAddress: "10.0.2.15:41620",
      remoteAddress: "128.61.241.144:30303",
      ...
    },
    protocols: { ... }
}]
Once geth is connected to some peers, it asks them for the current state of the
network and downloads it from them. We can view the state of this syncing phase
with other peers with eth.syncing.
> eth.syncing
{
  currentBlock: 23,
  highestBlock: 430,
  knownStates: 1758,
  pulledStates: 132,
  startingBlock: 0
}
> eth.syncing
false
We can see that in the first run of the command geth was syncing up to the
highest block of 430 and had only reached block 23. In the second run geth was
done syncing and was caught up to the network. Once geth is caught up, we can
query what the current block number is with eth.blockNumber.
> eth.blockNumber
4410
> eth.blockNumber
4412
This number goes up as more blocks are mined, hence the second run of the command has a higher number.
geth also lets us get the details of any particular block with
eth.getBlockByNumber(blockNumber):
> eth.getBlockByNumber(373)
{
  difficulty: "0x25e13",
  extraData: "0xd883010a1a846765746888676f312e31382e38856c696e7578",
  gasLimit: "0x1078366",
  gasUsed: "0x5208",
  hash: "0xffb47520d0a6b2b7c0527adc0df8ea5e7ceb2f0bf9ac401c1cf758695a7036ae",
  logsBloom: ...,
  miner: "0x0000000000000000000000000000000000000001",
  mixHash: "0xc1930c749b048fdda378270721d0b8a1340be5076625618476251eb7e67dbe48",
  nonce: "0x45b72dbcdda13e35",
  number: "0x175",
  parentHash: "0x174b7bea658f6091303cd22d244c80d303795ced0b0bafe9a3fe247f5a2e0c92",
  receiptsRoot: "0x056b23fbba480696b65fe5a59b8f2148a1299103c4f57df839233af2cf4ca2d2",
  sha3Uncles: "0x1dcc4de8dec75d7aab85b567b6ccd41ad312451b948a7413f0a142fd40d49347",
  size: "0x28d",
  stateRoot: "0xdbf89a7a0195e503c0efccedfebdfddb5fc7be9f8068e450df97d9878ab53cac",
  timestamp: "0x639b9634",
  totalDifficulty: "0x32dd569",
  transactions: ["0x78549be6e52dee15eabe63e794496e4dd1d884e0cfd06db7c0a905f0a1df438d"],
  transactionsRoot: "0x876b404a2dad9f53c0b9b324f683e97fd7b7b7511e86e510076e0458bd6ff248",
  uncles: []
}
There are a lot of fields in here but let's take a quick look at some of the most important ones:
difficulty- The difficulty determines how long it should take an individual miner to mine a block. This value adjusts based on how fast the network takes to mine blocks to keep it roughly around 10-15 seconds per block.extraData- An arbitrary piece of data (32 bytes) that the miner can put in. Many people choose to put a piece of ASCII text here.miner- The public address of the account who will receive the reward for mining this block.number- This block's number.transactions- The list of transactions included in this block.
Speaking of transactions, let's ask geth for the details of the transacton in
that block with eth.getTransaction(transactionId):
> eth.getTransaction("0x78549be6e52dee15eabe63e794496e4dd1d884e0cfd06db7c0a905f0a1df438d")
{
  blockHash: "0xffb47520d0a6b2b7c0527adc0df8ea5e7ceb2f0bf9ac401c1cf758695a7036ae",
  blockNumber: 373,
  chainId: "0x539",
  from: "0x540c9656d47f08656e5c7f41b8f14fd50c9d0a0a",
  gas: 21000,
  gasPrice: 1000000000,
  hash: "0x78549be6e52dee15eabe63e794496e4dd1d884e0cfd06db7c0a905f0a1df438d",
  input: "0x",
  nonce: 3,
  r: "0xfe56022a8e92b6a929c501821c660ec16b160d8f2fac9b47a8c43bb91a39721f",
  s: "0x95986804fab5e5242b8707bb337444da79b59f7975a981f5766a56f40e01461",
  to: "0xd34ae1cbe160943498bd0df46ece5347808fc628",
  transactionIndex: 0,
  type: "0x0",
  v: "0xa96",
  value: 1000000000000000000
}
The key things to note here are:
from- The address that the transaction came from.to- The address that the transaction is going to.value- The amount of ether, in the smallest denomination possible in ethereum,10^-18th of one ether (called a gwei). So in this transaction 1 ether was transferred.r, s, v- As we mentioned before, transactions on the network are signed by the private key of thefromaddress. These fields represent the signature.
We'll dive into the other fields like gas later in the course.
# Installing MetaMask
Now that we have a local node with a copy of the blockchain, we are going to install Metamask (opens new window) in a web browser to let websites access the blockchain.
# Installation
Follow the MetaMask official download instructions (opens new window) to install it to your browser.
After the MetaMask installation, select the option to Create a wallet and set an unlock password for MetaMask.
This will cause MetaMask to generate a new account (public/private key pair) and connects to the main Ethereum network through a public node.
# Connecting to our local node
We will now configure MetaMask to connect to classnode through the local geth node we set up earlier.
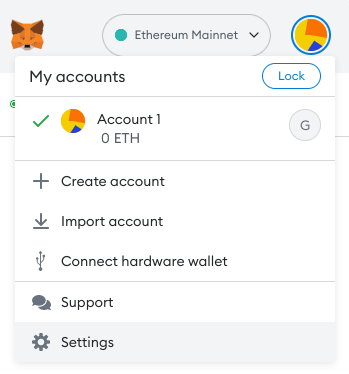
Click the account selector on the top-right and then select Settings:
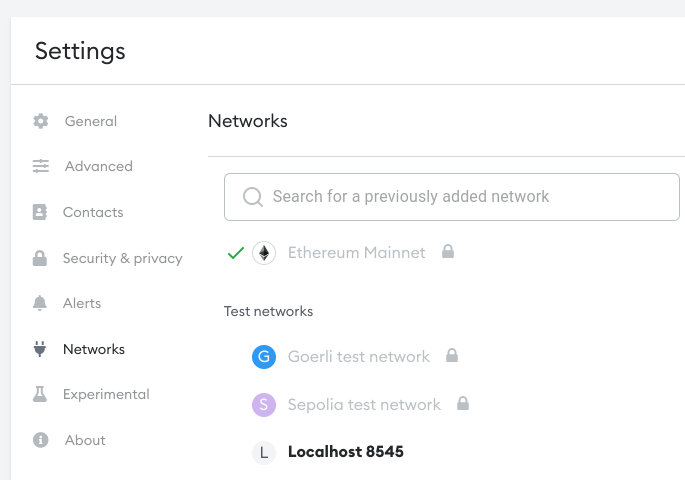
Click Networks and then the Localhost 8545 network:
- Use the following settings for the network and hit save:
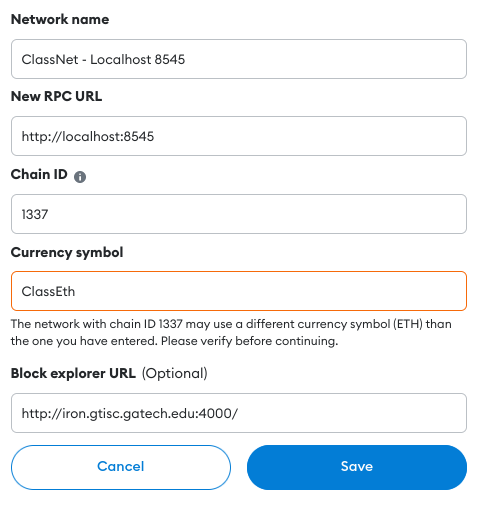
This makes MetaMask use our local geth node listening at localhost:8545 and
configures the block explorer we have for the class.
Click Show/hide test networks in the MetaMask network selector and enable showing of test networks:
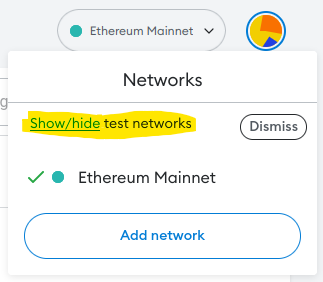
Select the ClassNet - Localhost 8545 we configured in the networks before.
MetaMask should now show your accounts in terms of our class network.
# Import MetaMask account
When we installed MetaMask, it generated a new account for us. Let's now import that account into geth so we can also use it from the console:
However, we will use the account we generated in geth earlier to have a consistent account in both places.
Click the triple-dot menu in MetaMask and then Account details.
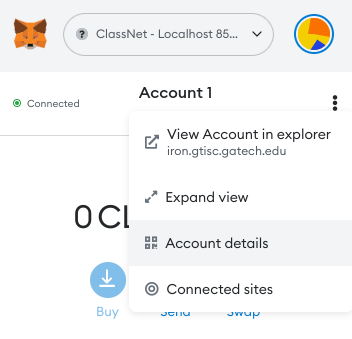
Click the Export private key button, type in your MetaMask password and read the warning.
Copy the private key and launch a geth console as seen in the Exploring geth section.
Run the command
personal.importRawKey("COPIED_KEY", ""). This will import the key with the passphrase being empty. geth will print the public key on a successful import:
> personal.importRawKey("ac...a0", "")
"0x015aa9fc32e280a70b639ecdc6203b917d9bfcdf"
We can now check that the account is imported and query it from the geth console.
> personal.listAccounts
["0x015aa9fc32e280a70b639ecdc6203b917d9bfcdf"]
> eth.getBalance(personal.listAccounts[0])
0
# First Transactions
Now that we have an account set up in both MetaMask and geth, let's explore some different options for performing transactions. Note that both interacting with smart contracts and sending coins in Ethereum use transactions.
# Acquiring ETH
Before we can make a transaction, we actually need to get some ETH in our account. We will dive into how to this is done in the real world in the Mining Section but for now we will use a website that simply sends you coins.
Go to http://iron.gtisc.gatech.edu/ (opens new window) in the browser you installed MetaMask on.
Login with your Georgia Tech account and connect MetaMask.
Verify your MetaMask account and then click the Send ETH button.
The website will send you 1 ETH and print a transaction id like
0xcb97fffb806bd508daf76b6505ea74ca79b7371a38f65159ed57671d0a6de8e1
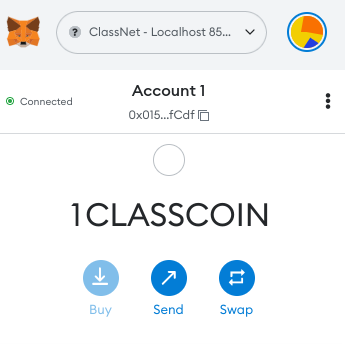
If you now click on the MetaMask icon in your browser you should be able to see that it has a balance of 1 ETH.
# Viewing Transactions
Since the website gave us a transaction id, let's look at the various ways we can look at it.
Firstly, we can query for the transaction in geth:
> eth.getTransaction("0xcb...e1")
{
  blockHash: "0x5af98cfe45c474361e6667af2a1c75acc718bf58671d3f8840dbf14b9fd6eff2",
  blockNumber: 16891,
  chainId: "0x539",
  from: "0x540c9656d47f08656e5c7f41b8f14fd50c9d0a0a",
  gas: 21000,
  gasPrice: 50000000000,
  hash: "0xcb97fffb806bd508daf76b6505ea74ca79b7371a38f65159ed57671d0a6de8e1",
  input: "0x",
  nonce: 6,
  r: "0x46143ab38a2688d20c4fe50c2b1c76795d20f38fe8cecd84d6df69d9cfc9431",
  s: "0x2d3ffb0eeb0368f3e13d957912965623cf14a59bd1c557a059a4bbbfc0c1e5df",
  to: "0x015aa9fc32e280a70b639ecdc6203b917d9bfcdf",
  transactionIndex: 0,
  type: "0x0",
  v: "0xa95",
  value: 1000000000000000000
}
This tells us which block it was part of, its lower level signature details, and much more.
A more user-friendly way to view the transaction is to use the BlockScout instance
we have for this class. You can find transactions under
http://iron.gtisc.gatech.edu:4000/tx/<transaction_id>.
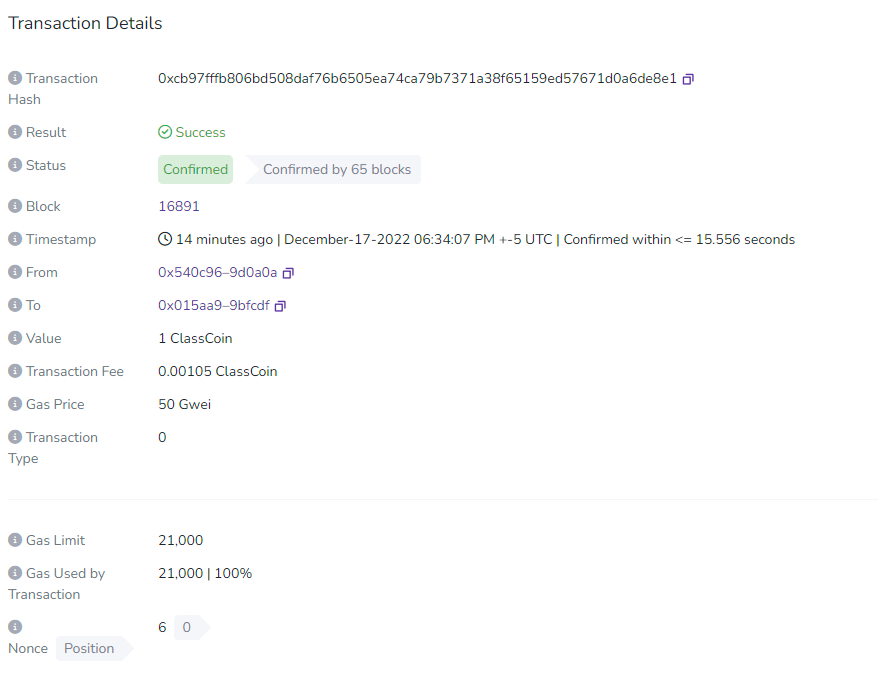
This contains a lot of the same details, but in a more user-friendly way. Note that blockscout can also show you the balances of addresses, contracts and details of individual blocks.
# Task: Course registration
We can now try to interact with our first contract. The contract we are interacting with looks like this, it is written in a language called Solidity (opens new window):
// Mapping from user names to Ethereum addresses
mapping(string => address) public userAddresses;
// Mapping from Ethereum addresses to user names
mapping(address => string) public userNames;

function registerUsername(string memory _username) public {
  require(userAddresses[_username] == address(0), "That username is already in use");
  require(bytes(userNames[msg.sender]).length == 0, "Address is already registered");
  require(bytes(_username).length != 0, "Can't use the empty string");

  userNames[msg.sender] = _username;
  userAddresses[_username] = msg.sender;
}
This contract will be how you pick your username to display on the dashboard!
As mentioned before, Metamask allows websites to interact with smart contracts, hence we can show a form below that allows you to simply set your username. When you submit the form, Metamask will pop up asking you to authorize the contract interaction.
Registration
Loading...
Note that after you're done, you'll see that your balance in Metamask has decreased. This is because interacting with a contract involves spending currency based on the executed code. We'll learn more about this later.
# Task: Sending Some Ether!
With username registration out of the way, let's get familiar with how challenges in this class will be deployed to the blockchain and solved.
At the bottom of this page you will find a Deploy Level button. Once you click it, a Metamask pop up will ask you to authorize the deployment. Once the challenge contract is deployed, its address will be displayed, as well as buttons to view it on the block explorer as well as its ABI.
Once you have solved the challenge, you can click Submit Level to validate your solution. If the challenge is solved successfully, you will receive a success message.
This first challenge requires you to send 3 gwei (0.000000003 eth to the contract. We will send 1 gwei through MetaMask, geth and web3.js, in turn.
Task 1.
MetaMask. The easiest way to do this is within MetaMask. Click the MetaMask icon and then click the Send button. Now paste in the address of the deployed level being shown at the bottom of the page and enter an amount of 0.000000001 ETH.
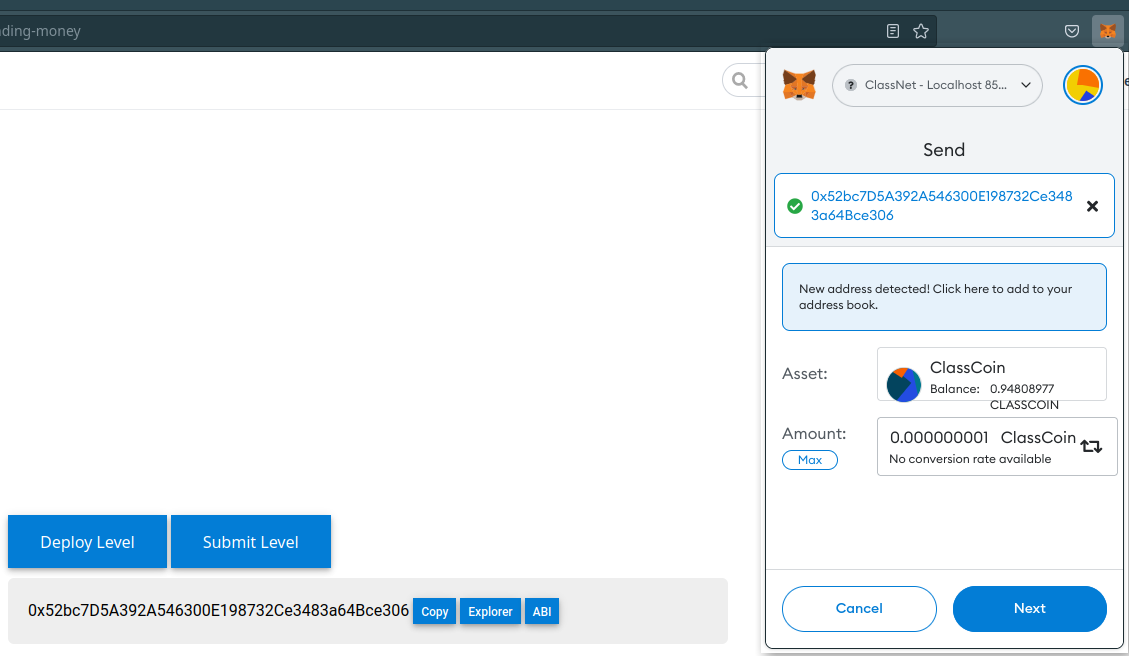
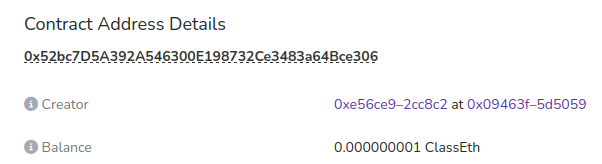
Metamask will then show you the estimated fees for the transaction and ask you to confirm. Hit confirm and the ETH will be sent. Once the transaction is confirmed, clicking the explorer link will show you the updated balance of the contract:
Task 2.
geth.
Now let's explore how to send money through the geth console. We will use
the method eth.sendTransaction. In the geth console type:
eth.sendTransaction({
  from: '0x015aa9fc32e280a70b639ecdc6203b917d9bfcdf',
  to: '0x52bc7D5A392A546300E198732Ce3483a64Bce306',
  value: web3.toWei(1, 'gwei')
});
where from: ... is the address of the account you generated. geth will then
print the transaction hash of the transfer, for example:
> eth.sendTransaction(...)
"0x95c747ce8d2cf0a891c423799d3b0eb650d14bd549cb3a6abc620538650bde16"
Note that geth locks accounts by default so that it cannot be used for
transactions for safety. In order to unlock the account we need to use the
personal.unlockAccounts function.
> personal.unlockAccounts("account_address_here")
Task 3.
web3.js.
Lastly, let's send some through web3.js (opens new window),
a popular way to develop and interact with an Ethereum smart contract.
You can interact with the level instance
on a web browser's development console
(press F12 in Chrome or Firefox).
When the level instance is created,
it is loaded to a contract variable
along with your address on a player variable.
> contract.address
'0x52bc7D5A392A546300E198732Ce3483a64Bce306'
> player
'0x015aa9fc32e280a70b639ecdc6203b917d9bfcdf'

// send a transaction with 1 gwei!
> await web3.eth.sendTransaction({from: player, to: contract.address, value: web3.utils.toWei("1", "gwei")})
{
    "transactionHash": "0xc224230323abdf7b09666cda321287b27b05bfbc33427e3a22d948b6eaf7fbb5",
    "transactionIndex": 0,
    "blockNumber": 786,
    "blockHash": "0xe829c1b9d3981fa1b5e668b638ed4d4031ea2d0a923fb388fb6ed43cc40f0924",
    "from": "0x015aa9fc32e280a70b639ecdc6203b917d9bfcdf",
    "to": "0x52bc7D5A392A546300E198732Ce3483a64Bce306",
    "cumulativeGasUsed": 21055,
    "gasUsed": 21055,
    "contractAddress": null,
    "effectiveGasPrice": 2000000000
    ...
}
What does your transaction looks like? Take a look at the transaction like below.
> await web3.eth.getTransaction("0xc224230323abdf7b09666cda321287b27b05bfbc33427e3a22d948b6eaf7fbb5")
{
    "hash": "0xc224230323abdf7b09666cda321287b27b05bfbc33427e3a22d948b6eaf7fbb5",
    "type": 0,
    "nonce": 11,
    "blockHash": "0xe829c1b9d3981fa1b5e668b638ed4d4031ea2d0a923fb388fb6ed43cc40f0924",
    "blockNumber": 786,
    "transactionIndex": 0,
    "from": "0x015aa9fc32e280a70b639ecdc6203b917d9bfcdf",
    "to": "0x52bc7D5A392A546300E198732Ce3483a64Bce306",
    "value": "1000000000",
    "gas": 31582,
    "gasPrice": "2000000000",
    "input": "0x",
    "v": "0xa95",
    "r": "0xadd45cd1a57aec32fedafc9cc4ff5ecf401f00fa69a8ce34f34a7cbc156a9b4",
    "s": "0x7b5caaaf97999ccf90f59278958939e1d0cc5e31ecbccdcdeb3b4fbf3546544"
}
Can you spot your transaction and block in BlockScout (opens new window)?
Once the transaction is confirmed, hit the Submit Level button, this will pop up a MetaMask window to authorize checking the solution. Wait a few minutes and you should receive a success message and the level will be solved!
You know what? Maybe try tipping your instructors (hmmm, how to find our addresses?) if you'd like!